PAKULA TAGLINE ASSEMBLY INSTRUCTIONS
PARTS OF THE TAGLINE SET-UP
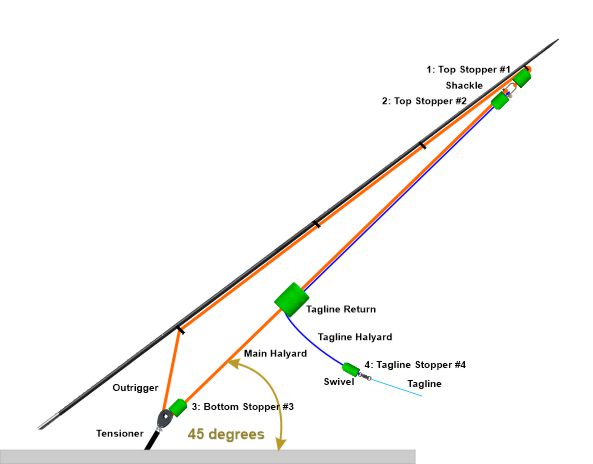 A: THE OUTRIGGER:
By far the best are stiff Carbon Fibre, with a length around the same as the boat’s length. Best if it set so that the Halyards are at around 45 degrees for the most effective use of the Taglines. It’s best to deploy the outriggers in their fishing position to set up the Halyards and Taglines.
B: HALYARDS
Sometimes the Tagline can twist around the main Halyard so it’s best to have different
coloured Halyards. A good thickness for the main Halyard is 2mm and Tagline Halyard 1.5mm. I prefer to use Whipper Snipper Cord as it’s tough and available in different colours making it easier to see if the Halyards are twisted.
C: TENSIONER
Lots of options which all include a pulley and around 6mm cord tied to a Saddle or the best is a Cam Cleat. Don’t use Shock (elastic) Cord when using Taglines. The length of the cord should be longer than you think you’ll need so you can make adjustments after we’ve made all of the connections.
D: TAGLINE RETURN
The return has the main and Tagline running through it.
E: STOPPERS
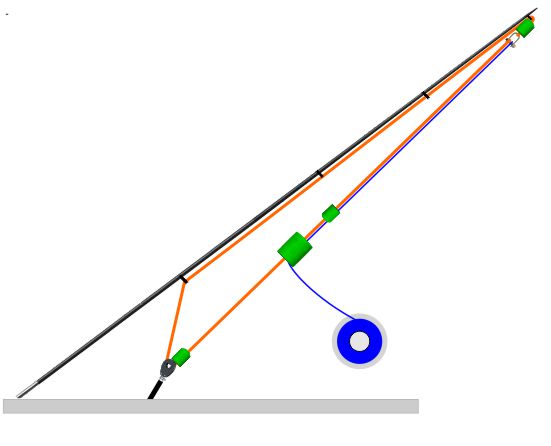
The Stoppers are often cork balls covering the crimps on the Halyards to prevent tangles and jamming in the outrigger tip and to stop the Return crashing into the Tensioner. The Pakula Stoppers are numbered.
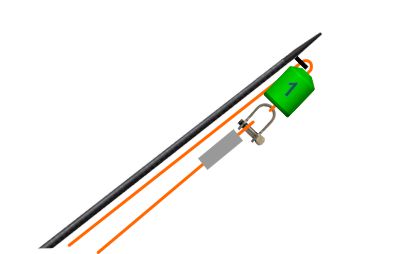
#1 is at the top to cover the Crimp and stop the Halyards jamming in the Outrigger Tip.
#2 covers the crimps on the Halyards and prevents the Return from jamming and being damaged on the crimps.
#3 stops the return from smashing into and jamming on the Tensioner.
#4 covers the crimp and stops the Tagline from sliding out of the Tagline Return.
F: SHACKLE
Easy to assemble and take apart the Halyards.
G: TAGLINE
A Swivel connects the Tagline cord which is cord around 3 or 4mm to the Halyard. The length of the Tagline should be long enough to make tying bands on it easy, so around 20cm.
TAGLINE SETUP OUTRIGGER MAIN HALYARD TIP END
- Cut the Main Halyard Nylon double the length of the outrigger plus around 3 metres extra to make it easy to assemble.
- Lay out the line to make sure the line is not twisted.
- Tie off one end somewhere close to the Tensioner.
- Feed the other end through the Tensioner and up the outrigger eyelets going from the base to the tip and pull through the rest of the Main Halyard Nylon.
- Thread on Stopper #1 thinner end first and crimp the Nylon to the top of the shackle. Make it tight to the shackle. There is no need to use chaffing tubing on the loop.
- Thread some cord-like waxed thread or dental floss through the Stopper and tie Stopper to the top of the shackle.
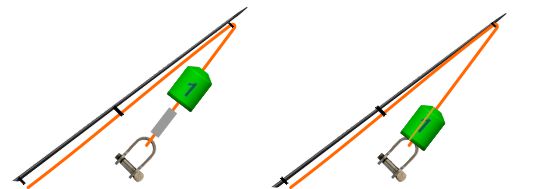
TAGLINE SETUP OUTRIGGER MAIN HALYARD BASE END
- Tie off the tensioning cord at a length you think is right. Don’t cut it yet, leave some extra for final adjustments.
- Undo the end you tied off to the boat and thread on Stopper #3 first flat end towards the Pulley then thread on the Tagline Return and the Stopper #2 thinner end first.
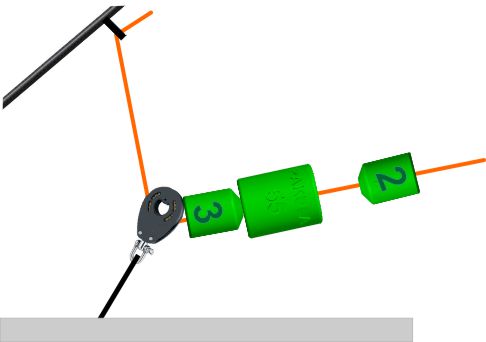
TIE OFF STOPPER #2
- As with Stopper #1 feed some waxed thread or detal floss through Stpper #2 and tie it tight to the shackle to prevent it from sliding down.
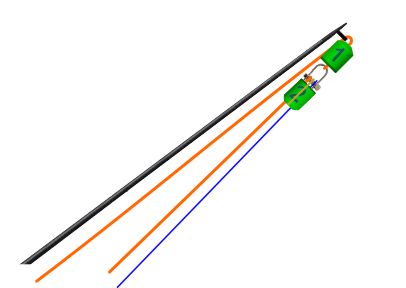
TAGLINE SETUP OUTRIGGER MAIN TO SHACKLE AND TENSION THE HALYARD
- Do not cut any length of the Halyard till the end of this process.
- Set the Pulley / Tensioner at the length you prefer. Don’t cut the length yet as you may need to tension it a little more or less once you finish this procedure.
- Feed the end of the Halyard through a crimp then through the shackle and back through the crimp. Don’t crimp the sleeve yet.
- With the crimp sleeve a few feet from the shackle tension the Halyard by pulling on the loose end. The crimp will slide back up towards the shackle as you do this. If you need more tension slide the crimp away from the shackle and continue to tension the Halyard.
- Once you get the tension right which is when the outrigger has a slight bend in it slide the crimp sleeve back up, tight to the shackle and crimp the sleeve. You can now trim the excess line. You don’t need any chafing tubing on the Halyard.
CONNECTING THE TAGLINE HALYARD
- Feed the Tagline Halyard up through the Tagline Return and Stopper #2 and crimp it to the shackle. Do not cut the line yet, leave it coming off the spool.
CONNECTING THE TAGLINE
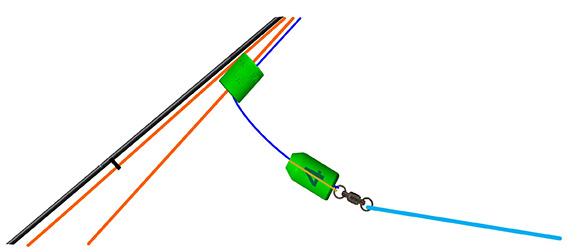
- The length of the Tagline is normally just shorter than the length of the main Halyard, so that the Return is stopped just before it hits Stopper #3, however more important is that it is long enough to easily connect the Tagline to the line on the rod you want to deploy. This can be achieved by extending the Tagline cord and not lengthening the Tagline Halyard.
- Once you decide what length the Tagline Halyard will be trim to the length you have decided on.
- Thread on Stopper #4
- Crimp the Halyard to a swivel. A small one that is less than the breaking strain of the line is advisable. IE1.6mm Nylon is about 70kg so a 100lb swivel is fine.
- Tie off Stopper #4 to the top of the swivel.
- Attach the length of cord you will use as the Tagline and you are done. Congratulations
IMPORTANT INFORMATION ABOUT USING TAGLINES
The Videos below will show some of the reasons for using Taglines and show a practical demonstration of using them.
Some things not included and corrections to the videos:
- Rubber Bands - In the video we check the breaking strain of the rubber bands using a boat cleat. It is better to check the breaking strain of the band when it is attached to your trolling line to get a better idea of what its breaking strain is. The correct breaking strain of the rubber band is close to the strike drag you are using. Check this at the dock or when the boat is on the trailer as many outriggers on boats have their limits to what load they can take.
- Taglines will give you an indication if your line is twisted by rolling up the Tagline which can cause a bust off on strike so keep an eye on the Taglines from time to time.
This is caused by line twist being introduced either when the reel was spooled with new line or you’re trolling a lure or bait that is spinning and twisting the line. This is most often caused by a rig that is not correct for your lure. To remove the twist take off the lure or bait and let line out the back while the boat is moving (the faster the better within reason). Wind it back on the reel through your fingers to help remove the twist. If the line is still twisted you may need to remove snap swivels and wind-on leaders and repeat the process.
OUTRIGGER TAGLINE DEMONSTRATION
TAGLINE USE


